Be Honest About Your Goals
Different ceramic goals require different materials, equipment, and techniques. Start with clarity about what you actually want to create.

You've just pulled your first real piece out of the kiln—a bowl you threw on the wheel, carefully trimmed, glazed with that beautiful blue you loved in the catalog. You're excited to see how it turned out. Then you notice the glaze has crawled away from half the surface, there's a crack running through the bottom, and somehow it's warped into something vaguely bowl-shaped but definitely not the bowl you made. Welcome to ceramics, where everything that can go wrong has twelve different ways to go wrong, and most of them happen in a kiln you can't see into.
Here's what nobody tells beginners about ceramics: it's not just about learning to center clay on a wheel or hand-build a pot. It's about understanding chemistry, physics, and a process with so many variables that experienced potters are still learning after decades. The clay has to be the right consistency. It has to dry evenly. It has to be bone-dry before bisque firing. The glaze has to be compatible with your clay body. The firing schedule has to be correct. One mistake anywhere in this chain and your piece cracks, warps, explodes, or just looks terrible. But when it all works? It's actual magic—you've transformed mud into permanent objects that will outlast you.
Ceramics Reality Check: This craft has the steepest learning curve of any art form. You'll fail more in your first year than in any other medium. Pieces will crack, warp, explode, and generally disappoint you. This is completely normal. Every experienced potter has a graveyard of failed pieces. The difference between beginners who quit and those who become potters is accepting that failure is built into the process.
Different ceramic goals require different materials, equipment, and techniques. Start with clarity about what you actually want to create.
What you're making: Things people eat and drink from
Clay choice: Stoneware—durable, food-safe when fired properly
Critical requirement: Food-safe glazes, lead-free formulations
Reality check: Food safety isn't negotiable. Use tested glazes from reputable manufacturers.
Good brands: Laguna B-Mix, Standard 112, Sheffield stoneware
What you're making: Objects to look at, not use
Clay choice: Sculptural stoneware or porcelain for fine detail
Glazing freedom: Artistic glazes, experimental surfaces, alternative firings all fair game
Reality check: More creative freedom but also more ways to fail spectacularly
Good brands: AMACO, Mayco, Spectrum for experimental glazes
What you're doing: Building skills, making mistakes, figuring things out
Clay choice: Earthenware—forgiving, low firing costs
Glaze approach: Student-grade with predictable results so you can learn without too many variables
Reality check: Don't invest in expensive materials until you know what you're doing
Good brands: Mayco Stroke & Coat, AMACO Teacher's Palette
What you're doing: Creating consistent, repeatable pieces efficiently
Clay requirements: Reliable throwing bodies, predictable shrinkage, consistent color
Glaze needs: Batch consistency, food safety, reliable results every time
Reality check: Consistency matters more than creativity when you're filling orders
Good clays: Cone 10 stoneware, Standard 112, Laguna B-Mix
| Type | Firing Temp | What It's Like | Best For | Good Brands |
|---|---|---|---|---|
| Earthenware | 1800-2100°F (Cone 06-04) | Porous, colorful, easy to work | Decorative work, tiles, learning | Standard 104, Laguna EM-210 |
| Stoneware | 2200-2400°F (Cone 6-10) | Strong, durable, becomes waterproof | Functional pottery, dinnerware | Standard 112, Laguna B-Mix |
| Porcelain | 2200-2400°F (Cone 6-10) | Fine, smooth, translucent, difficult | Fine work, detailed pieces | Standard 365, Laguna Frost |
| Paper Clay | Varies | Flexible, forgiving, repairs easily | Sculpture, experimental work | Standard Paper Clay |
Before You Buy a Kiln: Kilns draw serious power (often 240V), get incredibly hot, and can burn your house down if installed incorrectly. They're not impulse purchases. Access to a kiln through a community studio, school, or shared space is how most potters start—and many continue. Don't buy a kiln until you're certain ceramics is your thing and you understand what you're getting into.
Pottery is functional stuff—bowls, mugs, vases. Ceramics is the broader term covering everything made from fired clay, including pottery, sculpture, tiles, and industrial applications. All pottery is ceramics, but not all ceramics are pottery. The terms often get used interchangeably in casual conversation.
Not real ceramics. True ceramics require firing at temperatures only kilns reach—way hotter than any home oven. You can work with air-dry clay or polymer clay (Sculpey), but those aren't ceramics. Most beginners access kilns through community studios, schools, or makerspaces. Many potters never own their own kiln.
Earthenware (Standard 104, Laguna EM-210). It's forgiving to work with, fires at lower temperatures (cheaper), and accepts lots of different glazes. Plus the bright colors possible with low-fire glazes are immediately rewarding. Don't start with porcelain—it's finicky and will frustrate you unnecessarily.
Pyrometric cones. These small clay pyramids melt at specific temperatures, giving you visual confirmation your kiln reached the right heat. Digital controllers are convenient but cones are still the standard because they measure "heat work" (time plus temperature) not just temperature. Always use cones even if you have a digital kiln.
Welcome to ceramics. Glazes depend on temperature, kiln atmosphere, application thickness, clay body, and cooling rate. Keep detailed notes and make test tiles. Commercial glazes like Mayco Stroke & Coat or AMACO give more predictable results for beginners—save the experimental glazes until you understand the basics.
Wire cutters, ribs for shaping, trimming tools, sponges, and glaze brushes cover most needs. A basic kit from Kemper or Mudtools runs $30-50 and will last years. Don't buy fancy specialized tools until you know you need them—most sit unused in drawers.
Centering clay on the wheel: weeks to months of regular practice. Making consistent functional pieces: 1-2 years. Understanding glazes well enough to get predictable results: 2-3 years. Feeling truly competent: 5+ years. Anyone promising faster results is lying. Ceramics rewards patience and persistence.
Reality check: Hand-building isn't "easier" than wheel throwing, just different. Both require serious skill to do well.
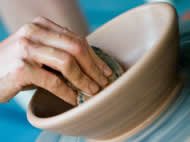
Pottery wheels let you create symmetrical round vessels through centrifugal force and hand control. It looks meditative and easy when experts do it. It's neither.
Modern wheels: Brent, Shimpo, and Speedball make reliable electric wheels with consistent speed control.
What beginners don't expect: Centering clay is physically demanding. Your back and shoulders will hurt. You'll fight the clay for weeks before it starts cooperating. The first fifty pieces you throw will be terrible. This is normal.
Why people persist: When it finally clicks, throwing is genuinely meditative and endlessly variable. But you have to get through the brutal learning curve first.
What can go wrong: Everything. Pieces can crack, warp, explode, slump, or have glaze defects. Most firings have some casualties. Experienced potters lose pieces regularly.
These small clay pyramids remain the most reliable way to know your firing is complete. Unlike digital thermometers measuring just temperature, cones respond to "heat work"—the combination of time and temperature that actually matters for clay and glaze maturation.
Why they still matter: Digital kilns lie sometimes. Thermocouples fail. Cones never lie—if the cone bent, you hit temperature. Use both digital control and witness cones.
Glazes are glass melted onto your pottery. Simple concept, infinite complications.
Beginner strategy: Use commercial glazes from Mayco, AMACO, or Spectrum. Learn how glazes behave before mixing your own. Glaze chemistry is legitimate chemistry—respect it.
Basic ceramics tools are relatively affordable. Don't overbuy.
Don't cheap out here: Bad brushes make glazing miserable. Good brushes from ceramics suppliers last for years.
Safety Is Not Optional: Clay dust causes silicosis (permanent lung scarring). Kilns release fumes. Some glaze materials are toxic. You need proper ventilation, dust control, and respiratory protection. This isn't being paranoid—it's the difference between a long pottery career and serious health problems. Set up your studio safely or don't do ceramics at home.
Health Hazards Are Real: Silica dust from clay causes permanent lung damage. Some glaze materials are toxic. Kiln fumes need ventilation. This isn't optional safety theater—it's preventing serious health problems. N95 masks minimum for dry clay, P100 for glaze mixing, proper ventilation always. Your lungs can't heal from silicosis.
The pattern: Most problems come from rushing. Ceramics punishes impatience.
Ceramic clays come in earthenware, stoneware, and porcelain formulations. Each has distinct working properties and firing requirements. Start with forgiving earthenware, advance to stoneware for function, tackle porcelain when you're ready for the challenge.
Ceramics tools range from simple wires and ribs to sophisticated wheels and kilns. Buy basics first, add specialized tools as you discover specific needs. Most fancy tools sit unused—buy for problems you actually have.
Glazes and underglazes provide functional and decorative finishes. For functional pottery, food safety is mandatory—use tested commercial glazes. For sculpture, experiment freely. Never confuse the two.
Ceramics books and media help navigate the complex technical requirements. This craft has too many variables to wing it—learn from people who've already made all the mistakes.
| Cone | Temperature | Used For | Clay Type |
|---|---|---|---|
| 022-019 | 1100-1300°F | Overglazes, china painting, lusters | Already-fired pottery |
| 06-04 | 1800-1900°F | Earthenware, majolica, low-fire glazes | Standard 104, terra cotta |
| 6 | 2232°F | Mid-range glazes, electric kilns | Most stoneware, porcelain |
| 10 | 2345°F | High-fire glazes, gas reduction | High-fire stoneware, porcelain |
| Brand | Firing Range | What It's Like | Best For |
|---|---|---|---|
| Mayco Stroke & Coat | Cone 05-06 | Extremely reliable, beginner-friendly | Learning, predictable results |
| AMACO Potter's Choice | Cone 5-6 | Food-safe, wide range, consistent | Functional pottery, production |
| Spectrum Glazes | Various | Professional quality, artistic effects | Studio pottery, artistic work |
| Coyote Glazes | Cone 6 | Contemporary colors, reactive | Modern pottery, gallery work |
Modern studios emphasize lead-free glazes (safer and work better), energy-efficient kilns (lower costs and environmental impact), and clay reclamation (waste becomes usable clay again). Many studios now use solar drying and locally-sourced materials. Ceramics can be surprisingly sustainable when done thoughtfully—pottery lasts centuries with minimal environmental cost after the initial firing.
Earthenware
Fired at 1800-2100°F (Cone 06-04). Standard 104 and Laguna EM-210 are forgiving to work with, inexpensive to fire, and accept vibrant glaze colors. Remains porous, requires glazing for water resistance. Perfect for learning and decorative work.
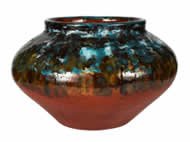
Stoneware
Fired at 2200-2400°F (Cone 6-10). Standard 112 and Laguna B-Mix are workhorses for functional pottery. Becomes vitreous (waterproof) when properly fired. Durable, food-safe, handles daily use. Most production potters use stoneware.
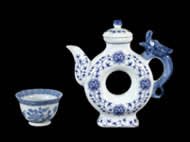
Porcelain
Fired to high temperatures. Standard 365 and Laguna Frost are notoriously difficult to work with—porcelain is unforgiving and demands precision. Translucent, smooth, elegant results when done right. Start with this only after mastering stoneware or you'll just waste money on failures.


Mon - Fri: 10 am - 7 pm
Saturday: 10 am - 6 pm
Sunday: 12 pm - 6 pm